I was asked to revive an old Sun Fire V120 server and install Solaris 10 on it for some Oracle tests. The server is in a server room a couple kilometers away — I could indeed drive there, put the DVD in the drive and install it that way but I found me too lazy to lift my bottom. Instead I decided to give a Solaris Jumpstart installation a try. I never did it before so I started googling — most tutorials explained how to setup Jumpstart server on Solaris but I didn’t have another Solaris available in that subnet. Only some Linux boxes. So I kept on googling, found some hints but not a complete tutorial on doing a Solaris Jumpstart installation from a Linux server. Following the break is my take on the How-To.
Let’s put two things together today…
- The BusPirate is the ultimate tinkerers’ tool that makes the SPI, I2C, 1-Wire, UART, JTAG and some other low-level protocols available to an ordinary PC equipped with a serial or USB port. That way a PC can talk to many digital electronic components, from temperature sensors through microcontrollers and memories to I/O devices like LCD displays or ethernet interfaces.
- Uploading a firmware to an Atmel AVR microcontroller (MCU) is possible through many different ways, with the most common and universal probably being ICSP — In Circuit System Programming. In essence ICSP is an SPI-based protocol, where the programmer sends special programming commands to the AVR chip along with data to be written to the flash memory. In most cases the MCU doesn’t even need to be removed from its circuit first.
- So the AVR can be programmed using SPI and the BusPirate can talk SPI, therefore the BusPirate can program AVRs, correct?
Yes, of course it can! All you need is a recent enough avrdude — either the current SVN checkout or avrdude 5.7 once it is released.

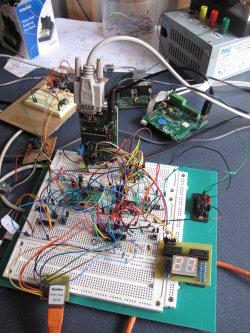
BusPirate with 2 independent AVRs.
AVRdude with BusPirate
Programming one AVR is a breeze, let’s have an example of ATtiny2313. Connect BusPirate to the IC like this:
| BusPirate | ATtiny2313 | |
| Signal | DIP20 PIN | |
| GND | GND | 10 |
| +5V or +3.3V | Vcc | 20 |
| CS | RESET | 1 |
| MOSI | MOSI | 17 |
| MISO | MISO | 18 |
| SCL/CLK | SCK | 19 |
It is possible, although not required, to power the chip from the BusPirate during programming. Even if the BP is not used as a Vcc supply for AVR their GNDs should still be interconnected.
All right, the ultracomplex “circuit” is ready to go. It’s time to test if it works…
.../attiny2313/test $ avrdude -p attiny2313 -c buspirate Detecting BusPirate... ** ** Bus Pirate v1a ** Firmware v3.0 ** DEVID:0x0447 REVID:0x3003 (A3) ** http://dangerousprototypes.com ** BusPirate: using BINARY mode avrdude: AVR device initialized and ready to accept instructions Reading | ################################################## | 100% 0.02s avrdude: Device signature = 0x1e910a avrdude: safemode: Fuses OK avrdude done. Thank you.
avrdude was able to read the device signature so the connection apparently works. Now it’s time to run avrdude with -U flash:w:project.hex to actually flash the firmware in.
One … two … three AVRs!
Any ICSP programmer can program one chip at a time. However the BusPirate goes a step further — we can connect up to 3 independent AVRs to a single BP and without any re-wiring program them. Each with a different firmware of course.
How come? The programmer grabs AVR’s attention by pulling its RESET pin Low. Check again the table above: BP’s CS (Chip Select) is connected to AVR’s RESET — once CS->RESET signal goes down (and stays down) the AVR is ready to accept SPI programming commands. However the BusPirate also has an AUX output pin that is independent on CS. If we add one more AVR to the picture with the same MISO, MOSI and CLK setup, but with its RESET connected to BP’s AUX instead of CS we’re instantly able to program either of the two chips because avrdude can be ordered to pull down AUX instead of CS using -x reset=aux parameter.
.../at90usb162/test $ avrdude -p at90usb162 -c buspirate -x reset=aux
Detecting BusPirate...
[...]
avrdude: Device signature = 0x1e9482
avrdude: safemode: Fuses OK
Talking to the other AVR works as well and its signature (different to the first one) has been read.
I also have an older BusPirate “clone” from Fundamental Logic — the hardware revision is v1a which is the only one that has one additional pin — AUX2. Obviously you can now add a 3rd AVR into the circuit and use avrdude -x reset=aux2 for its programming.
… four … five … six … seven AVRs!
What? Is there a BusPirate with 7 AUX’es?! No, there is not. However we can command avrdude not only to pull down either CS or AUX or AUX2, we can tell it to pull down, say CS and AUX2, while leaving AUX high: avrdude -x reset=cs,aux2. So what? Well then we can use a simple 3-bits to 1-of-8 decoder (for example 74HCT138), connect CS, AUX and AUX2 to its address inputs and use the 1-of-8-is-Low outputs for selecting the AVR to talk to. That would give us access to up to 7 independent AVRs in a single circuit with a single BusPirate (v1a only though). Why 7 and not all 8? Figure that out for a homework ;-)

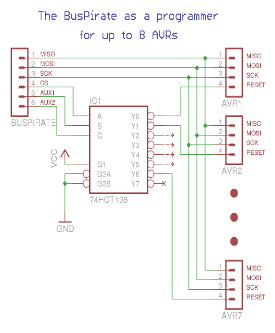
BusPirate with 3-bits to 1-of-8 decoder.
Only one output [Y0..Y7] is low at any time.
The same approach can be used to program three AVRs from a newer BusPirates without AUX2 output. Simply get a 2-bits to 1-of-4 decoder (for example 74HCT155) and, again, as a homework think of why we can only attach 3 AVRs and not all four ;-)
Decoupling
There is a little catch though. If all the AVRs don’t belong to the same design they should not be interconnected through SPI lines either. For example I’ve got ATtiny2313 and AT90USB162 on my breadboard but they do different things — the ATtiny is a temperature display with a SPI-connected sensor, while the AT90 has an ENC28J60 ethernet interface attached to its SPI pins. These two SPI buses are totally independent and we can’t simply connect all the MISOs and MOSIs together. We need to decouple them from each other and only pass the BusPirate SPI through to a single chip at a time. How? Using a 3-state bus buffer, for example 74HCT244. Since it’s got 3-state outputs it is virtually non-existent on the SPI bus unless active. A RESET Low signal coming from BusPirate’s CS or AUX or from the 1-of-N decoder activates the outputs of one of the 4-line gates and enables passing the SPI traffic between the BusPirate and the selected AVR. No other AVR will notice that one of these little silicon guys is being programmed. Huh? All right, here’s the schema ;-)

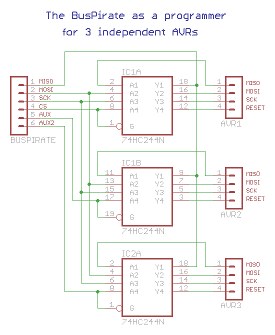
Decoupling the BusPirate from AVRs
to prevent interference with normal SPI traffic.
Etc…
A few days ago Ian, the author of BusPirate, announced the availability of STK500 AVR programmer firmware for the BusPirate hardware. I haven’t had a time to give it a try yet. I expect it may be somewhat faster comparing to avrdude -c buspirate. On the other hand it probably doesn’t support more than one concurrently connected chip — a feature for which I’m keen to sacrifice some programming speed.
The rumours go that there is one more BusPirate firmware on the way — a Microchip PIC programmer. I can’t wait to see that in action. And don’t forget the original BP firmware that can do a lot more than just programming microcontrollers. Sadly there doesn’t seem to be a dedicated, well structured BusPirate project website — you’re left to gather the information scattered throughout the BusPirate blog to find out all the details.
BusPirate is truly one of the must-have tools for anyone working with microcontrollers and related low-level communication protocols. It’s incredible how much functionality can be found in a $30 gadget.
I own a bunch of devices that appear as /dev/ttyUSB<something> in the system. At least three of them I use regularly: Arduino, BusPirate and a simple USB-to-RS232 converter to talk to my ARM boards. I keep plugging them in and pulling them out from the USB ports and they keep getting names like /dev/ttyUSB0 or ttyUSB1 or ttyUSB2 or so. Sadly the device names are not persistent — whether the BusPirate pops up as /dev/ttyUSB0 or /dev/ttyUSB2 depends on the order in which are the devices discovered by the kernel. That makes things difficult — it usually requires a trial and error approach to find out what the hell is the ARM board’s tty name this time.
Wouldn’t it be nice to have persistent, descriptive device name for each of these toys? Like /dev/arduino, /dev/buspirate and /dev/arm?
usb-serial devices
All the above mentioned gadgets have usb-serial interface, which in essence means that the serial port traffic (UART) is passed to the host in a USB data stream instead of through a dedicated RS232 serial port.
Every USB device has a Vendor ID and a Product ID as seen for instance in lsusb output:
~ # lsusb Bus 001 Device 001: ID 1d6b:0002 Linux Foundation 2.0 root hub Bus 001 Device 011: ID 0403:6001 FTDI FT232 USB-Serial (UART) IC Bus 001 Device 010: ID 0403:6001 FTDI FT232 USB-Serial (UART) IC Bus 001 Device 005: ID 0402:5632 ALi Corp. USB 2.0 Host-to-Host Link Bus 002 Device 005: ID 0403:6001 FTDI FT232 USB-Serial (UART) IC [...]
Unfortunately all the three peripherals apparently use the same chip — FT232 (these days probably the most common usb-serial interface) and therefore have the same VendorID:ProductID pair as emphasized in the listing. To distinguish between them we need some other unique identifier — in this case a serial number. These are the messages recorded in /var/log/messages when Arduino is plugged in:
usb 2-4: new full speed USB device using ohci_hcd and address 5 ftdi_sio 2-4:1.0: FTDI USB Serial Device converter detected drivers/usb/serial/ftdi_sio.c: Detected FT232RL usb 2-4: FTDI USB Serial Device converter now attached to ttyUSB1 usb 2-4: New USB device found, idVendor=0403, idProduct=6001 usb 2-4: Product: FT232R USB UART usb 2-4: Manufacturer: FTDI usb 2-4: SerialNumber: A6008isP
(Update, as pointed out by Martijn in the comments…) Another way to find out the serial number is using udevadm command:
~ # udevadm info -a -n /dev/ttyUSB1 | grep '{serial}' | head -n1
ATTRS{serial}=="A6008isP"
UDEV rules
Now with the list of serial numbers in hand let’s create a UDEV ruleset that’ll make a nice symbolic link for each of these devices. UDEV rules are usually scattered into many files in /etc/udev/rules.d. Create a new file called 99-usb-serial.rules and put the following lines in there:
SUBSYSTEM=="tty", ATTRS{idVendor}=="0403", ATTRS{idProduct}=="6001", ATTRS{serial}=="A6008isP", SYMLINK+="arduino"
SUBSYSTEM=="tty", ATTRS{idVendor}=="0403", ATTRS{idProduct}=="6001", ATTRS{serial}=="A7004IXj", SYMLINK+="buspirate"
SUBSYSTEM=="tty", ATTRS{idVendor}=="0403", ATTRS{idProduct}=="6001", ATTRS{serial}=="FTDIF46B", SYMLINK+="ttyUSB.ARM"
By now it should be obvious what these lines mean. Perhaps just a note for the last entry on each line — SYMLINK+="arduino" means that UDEV should create a symlink /dev/arduino pointing to the actual /dev/ttyUSB* device. In other words the device names will continue to be assigned ad-hoc but the symbolic links will always point to the right device node. Let’s see. Unplug Arduino and plug it back again…
~# ls -l /dev/arduino lrwxrwxrwx 1 root root 7 Nov 25 22:12 /dev/arduino -> ttyUSB1 ~# ls -l /dev/ttyUSB1 crw-rw---- 1 root uucp 188, 0 Nov 25 22:12 /dev/ttyUSB1
That looks good. The last step is to configure minicom, avrdude and all the other relevant tools to use these new names and forget about chasing the right /dev/ttyUSB* every second day.
Some HP ProLiant systems come with a stripped down version of ILO (Integrated Lights-Out) management card that, without an additional license, supports only text mode remote console. While this is indeed a big problem for Windows users who are therefore forced to purchase the Advanced ILO license, Linux can happily run in a text mode. With one exception though: installation disks of most current distributions boot up into a graphical mode first and only then allow selecting a text-only installation. That’s true at least for RedHat Enterprise, CentOS, OpenSUSE and Ubuntu.

Useless CentOS boot-time graphical splash screen.
Since the boot-time graphics is totally useless let’s build a custom installation CD with a text-only boot loader. In the following how-to we are going to rebuild the first CD of CentOS 5.3 in x86_64 version. However the general concept should be applicable to the installation CDs or DVDs of any current distribution as long as they use isolinux boot loader. Majority of them do.
Text-only CentOS
- Download
CentOS-5.3-x86_64-bin-1of7.isofrom your favourite CentOS mirror. - Mount it as a loop-back device so that we can access its content:
~# mount -oloop,ro /data/iso/CentOS/CentOS-5.3-x86_64-bin-1of7.iso /mnt ~# cd /mnt
- Copy
isolinuxsubdirectory to some writable location, for instance to/tmp:
~# cp -a /mnt/isolinux /tmp ~# cd /tmp/isolinux /tmp/isolinux# ls -l total 8616 -r--r--r-- 1 root root 2048 Mar 22 02:14 boot.cat -rw-r--r-- 1 root root 292 Mar 22 02:14 boot.msg -rw-r--r-- 1 root root 919 Mar 22 02:14 general.msg -rw-r--r-- 1 root root 6640927 Mar 22 02:13 initrd.img -r--r--r-- 1 root root 10648 Mar 22 02:13 isolinux.bin -r-xr-xr-x 1 root root 364 Mar 22 02:14 isolinux.cfg* -r--r--r-- 1 root root 94600 Mar 22 02:14 memtest -rw-r--r-- 1 root root 817 Mar 22 02:14 options.msg -rw-r--r-- 1 root root 517 Mar 22 02:14 param.msg -rw-r--r-- 1 root root 490 Mar 22 02:14 rescue.msg -rw-r--r-- 1 root root 63803 Mar 22 02:14 splash.lss -r--r--r-- 1 root root 2659 Mar 22 02:14 TRANS.TBL -rw-r--r-- 1 root root 1889308 Mar 22 02:13 vmlinuz
- Remove
boot.catfile—it will be re-created later. Also removesplash.lssas that’s the boot-loader image we don’t like.
/tmp/isolinux# rm -f boot.cat splash.lss
- Edit
boot.msgfile and remove the reference tosplash.lss(it’s on the 2nd line, remove the whole line). Eventually replace it with a custom message saying it’s a CentOS 5.3 installation. Also change the first hint message (you’ll see later why):
^L
^Xsplash.lss[[CentOS 5.3 x86-64]] — Toinstall or upgrade in graphical mode,boot from the hard drive press the ^O0b^O07 key. — To install or upgrade in text mode, type: ^O0blinux text ^O07. [...] - Optionally edit
isolinux.cfgand change the first line fromdefault linuxtodefault local
default
This change will make the CD boot from the harddrive by default. That means you can leave the CD in the drive and the server will come up properly even after reboot. Original CD starts the graphical installation by default which is IMHO a bad idea.linuxlocal prompt 1 timeout 600 display boot.msg - Now with all the changes done we need to put the modified files back into the CD tree and recreate the ISO image.
- One way is to copy everything off /mnt and place the changes there. That's a needlessly space-consuming approach, especially with DVDs.
- Better way is to bind-mount
/tmp/isolinuxback to/mnt/isolinuxand effectively replace the old directory with our modified one:
~# mount --bind /tmp/isolinux /mnt/isolinux
- Now compile the new text-only bootable ISO image using
mkisofs:
~# mkisofs -R -J -T -v -V "CentOS 5.3 x86-64 text" \ -no-emul-boot -boot-load-size 4 -boot-info-table \ -b isolinux/isolinux.bin -c isolinux/boot.cat \ -o /data/iso/CentOS/CentOS-5.3-x86_64-bin-1of7-text.iso /mnt mkisofs 2.01 (cpu-pc-linux-gnu) Scanning /mnt Scanning /mnt/CentOS Excluded: /mnt/CentOS/TRANS.TBL Scanning /mnt/images [...] 97.59% done, estimate finish Thu Jul 2 13:03:10 2009 99.16% done, estimate finish Thu Jul 2 13:03:10 2009 Total translation table size: 197177 Total rockridge attributes bytes: 83484 Total directory bytes: 129024 Path table size(bytes): 112 Done with: The File(s) Block(s) 317394 Writing: Ending Padblock Start Block 317533 Done with: Ending Padblock Block(s) 150 Max brk space used c6000 317683 extents written (620 MB) - That's it. Now burn the ISO onto a CD and enjoy a pure text-only CentOS installation!

New text-only CentOS boot loader
Here we go, this disk will work nicely even on a ProLiant with a crippled ILO :-)
Oh, by the way, you may wonder how did I make the purple colour for the isolinux can interpret some special character sequences as colour-codes and I simply wrapped the title with these. Have a look here for a list of these codes or download IsoLinux Mate if you want a user-friendly tool for creating custom isolinux boot screens.
I am used to have my own server on the Internet. Ever since I first got in touch with the Net in mid-90’s I have had at least one server of my own serving my emails, domains, websites, etc. I used to have the machine my server was running on in a colocation facility (aka ISP server housing) in Prague, but then in 2005 I moved to New Zealand, leaving my server some 20.000km behind. That soon became a problem. Whenever the hardware experienced issues or the OS needed an upgrade I was inconveniently too far. Luckily the ISP staff was very helpful and they often tried hard to help me out but the distance between me and the server was a real issue. Finally, in June 2008, I undertook the big step and shifted from my very own hardware to a hosted Virtual Private Server (VPS).
My first VPS
I played with VMware and Xen before, but didn’t have any prior experience with commercial VPS offerings. I pretty much randomly picked one of the providers and paid for a mid-sized VPS. Yet before I could move my data across I had to accept some new limits of my new OpenVZ-based VPS:
- I used to use POSIX ACLs for access control on the multiuser server. That was not possible anymore, the VPS provider insisted OpenVZ didn’t support POSIX ACL.
- I used to be connected to a native IPv6 network — now I couldn’t even get a tunnel since the VPS kernel didn’t have IPv6 compiled in.
- OpenVPN setup was a bit of a challenge as the kernel didn’t have TUN driver enabled by default.
- I used to have Apache
chrooted innoexec,nodevmounted partition for security reasons. Again, impossible. - … and so on
Such a VPS is probably a reasonable choice for a website hosting, less so for a multiuser multipurpose internet server. Sadly I was in a bit of a pressure and didn’t have time to look for something better. Anyway, few days later I had CentOS 5 set up, all the required services — web, mail, dns, mysql, … — were running and I didn’t have to care about the hardware anymore. All good.
However after some time I started experiencing more and more problems ranging from occasional poor performance and unplanned outages right to lost files and directories after a host-server crash. Then they raised their prices by 20% and I decided to move on. But where?
IPv6 VPS
My next VPS must be Linux, if possible CentOS 5 since that’s what I have now. Migration in such a case would be a matter of copying 99% of files across, leaving alone just the network config. I also want to get back all the features from the list above. While most of them are fairly common, especially on Xen-powered hostings, the native IPv6 requirement was a tough nut to crack. After going through many websites and contacting some 30 VPS companies I compiled a list of 5 (yes, only five) native IPv6 enabled VPS hostings. Increible! Here they are:
| VPS Provider | Country | Note |
| goscomb.net | United Kingdom | |
| rapidxen.net | USA | |
| serveraxis.com | USA | |
| xencon.net | Germany | |
| verio.com | USA | FreeBSD only, no Linux |
I’m sure there are more but I couldn’t find them. Perhaps all those missing ones treat IPv6 as an established technology not worth mentioning on their websites. I wish. But I doubt …
Let me know if you’re aware of anyone else with native IPv6, I’ll add them to the table.
My next VPS
I decided to go ahead with Goscomb — for start I’ve got a small VPS for testing and am pretty impressed. It’s a fully virtualised Xen host which means it behaves like a real machine — there is GRUB boot loader, it could run my own kernel if I wanted to, I can insert any kernel modules I need, have a total control over the (virtual) disk, etc. Just like a real system. It even has an out-of-band console via VNC which means I can play with a firewall setup without worrying that I cut my access short. And it does have native IPv6, yay! Most of the Europe is just a few hops away and traffic to US is reasonably fast as well. From New Zealand everything is slow so it doesn’t really matter if the server is in US or UK.
There are only two downsides I discovered so far — Goscomb doesn’t accept PayPal payments and doesn’t provide remote VPS reset. Both are pretty minor — for payments I can use my VISA card and for forced restart, if I ever need one, will open a support ticket — so far they were responding reasonably fast.
I’ll post an update once my server — and this blog — is moved to its new home and IPv6 enabled :-)
Today I was asked to perform some Linux server maintenance for an important client. They use Citrix Access Gateway™ (CAG) for remote access to their systems. The plan was to login to the Citrix Access Gateway web interface from Firefox, click the PuTTY icon, let CAG server execute the PuTTY SSH client and display its interface on my Linux desktop via a locally installed ICA client. Once it’s up enter the remote Linux server’s IP and do my job. Unfortunately when I clicked the PuTTY icon things went wrong instantly:

You have not chosen to trust ‘Thawte Server CA’, the issuer of the server’s security certificate.
Aha, now what? Apparently Citrix ICAclient comes with its own set of trusted Certification Authorities. Both Firefox and my system-wide CA list are set to trust Thawte but ICAclient didn’t. After a bit of research I have found the ICAclient’s trusted certificates are stored in ~/ICAClient/linuxx86/keystore/cacerts/ directory:
~/ICAClient/linuxx86/keystore/cacerts $ ls -l -r--r--r-- 1 mludvig users 891 2009-06-07 12:00 BTCTRoot.crt -r--r--r-- 1 mludvig users 774 2009-06-07 12:00 Class3PCA_G2_v2.crt -r--r--r-- 1 mludvig users 774 2009-06-07 12:00 Class4PCA_G2_v2.crt -r--r--r-- 1 mludvig users 606 2009-06-07 12:00 GTECTGlobalRoot.crt -r--r--r-- 1 mludvig users 576 2009-06-07 12:00 Pcs3ss_v4.crt -r--r--r-- 1 mludvig users 568 2009-06-07 12:00 SecureServer.crt
That’s a good start. Now find out in what format these certs are — two most common formats are DER (binary format) and PEM (ASCII encoded). Quick check reveals that these files are binary, therefore most likely in DER format. Verify the assumption with openssl:
.../cacerts $ openssl x509 -inform der -text -noout -in BTCTRoot.crt
Certificate:
Data:
Version: 3 (0x2)
Serial Number: 33554617 (0x20000b9)
Signature Algorithm: sha1WithRSAEncryption
Issuer: C=IE, O=Baltimore, OU=CyberTrust, CN=Baltimore CyberTrust Root
[...]
Very good — openssl was told to open it as DER and gave us a reasonable output, so it’s DER! Now we need to get the Thawte Server CA certificate from somewhere, convert it to DER format and save into this directory. It is almost certain that the Citrix Access Gateway web interface uses the very same SSL certificate that the ICA client complains about. So … grab it from there!
Right click somewhere on the page and select View Page Info — a Page info dialog should pop up. Select the last tab — Security — and then View Certificate

Page info — View Certificate
Certificate Viewer will pop up. Select the second tab — Details. There, in the Certificate Hierarchy tree select to top-most item, Thawte Server CA in our case. Click the Export button at the bottom and save the certificate for example as ~/ThawteServerCA.pem.

Export “Thawte Server CA” certificate
Now the last step on our quest — convert the certificate from PEM format to DER with the help of openssl and verify that it worked out. Note that we’re still in the ICAclient’s keystore/cacerts directory:
.../cacerts $ openssl x509 -inform pem -outform der -in ~/ThawteServerCA.pem -out ThawteServerCA.crt
.../cacerts $ openssl x509 -inform der -in ThawteServerCA.crt -text -noout
Certificate:
Data:
Version: 3 (0x2)
Serial Number: 1 (0x1)
Signature Algorithm: md5WithRSAEncryption
Issuer: C=ZA, ST=Western Cape, L=Cape Town, O=Thawte Consulting cc,
OU=Certification Services Division,
CN=Thawte Server CA
Subject: C=ZA, ST=Western Cape, L=Cape Town, O=Thawte Consulting cc,
OU=Certification Services Division,
CN=Thawte Server CA
[...]
All right, we’re set to go. Click on the PuTTY icon again and see how far we get.

PuTTY is now starting
Voilà, things look good. A while later PuTTY is up, running on the remote Citrix Access Gateway server, ready to open a SSH connection to the Linux box in the company’s internal network.
test.sh that generates both standard output (stdout) and error message (stderr):
#!/bin/sh echo "Going to run /non/existent" /non/existentThat will produce an expected result when run:
~$ ./test.sh Going to run /non/existent ./test.sh: line 4: /non/existent: No such file or directory ~$Now the question is how to redirect both messages into a logfile? The poor man’s approach is to create a wrapper-script
test-wrapper.sh:
#!/bin/sh exec ./test.sh > test.log 2>&1Running that will send all the output into
test.log logfile:
~$ ./test-wrapper.sh ~$ cat test.log Going to run /non/existent test.sh: line 4: /non/existent: No such file or directory ~$Works a treat, but do we really need two scripts to solve such a simple problem? Of course we don’t. Let’s modify
test.sh this way:
#!/bin/sh exec > test2.log exec 2>&1 echo "Going to run /non/existent" /non/existentRun it and enjoy the output redirected to a log file
test2.log:
~$ ./test.sh ~$ cat test2.log Going to run /non/existent ./test.sh: line 7: /non/existent: No such file or directory ~$Voilà, here you go. Self contained script that sets up the redirection internally. No need for stupid wrappers anymore ;-)
Earlier today I worked on migrating a D3 database server to a VMware ESX environment. The tool that we used for migration did a good job in converting the RHEL3 operating system and all the Linux filesystems, but failed to copy the D3’s raw data partition:
old-server:~# fdisk -l /dev/sda [...] /dev/sda12 10965 17816 55038658+ d3 Unknown
Now what? I didn’t have enough space neither on the source server nor on the destination VM to dump the partition contents to a file, copy across and reload back to /dev/sda12 on the VM. It had to be done online.
Gladly, SSH has the ability to run a command remotely and feed its standard output to some other program running locally. Using that feature it’s easy to copy the raw partition — simply run dd if=/dev/sda12 on the source server and dd of=/dev/sda12 on the destination VM. The first dd without any other parameters will print whatever it reads from /dev/sda12 on the old, source server to its standard output. The second dd, inversely, will write whatever it reads from the standard input down to /dev/sda12 on the new virtual machine. Glue it together with this ssh command:
new-server:~# ssh old-server "dd if=/dev/sda12" | dd of=/dev/sda12
That’s all sweet, but … dd doesn’t provide any progress tracking. In my case I had to transfer over 50GB of data and had only a vague idea how fast it goes. Should I wait? Or leave it overnight? Hmm, hard to tell.
Finally I came up with a simple solution for checking progress of dd — get a sample data, say 1kB, from a given offset on both the source and destination partition and compare their checksums:
old-server:~# dd if=/dev/sda12 bs=1k count=1 skip=5M | md5sum 7b10e9e1029c4c0f3901ee13db18a927 — new-server:~# dd if=/dev/sda12 bs=1k count=1 skip=5M | md5sum 0f343b0931126a20f133d67c2b018a3b —
OK, the checksums didn’t match. Yet. I kept re-running the command on the new server and as soon as it returned the same checksum as on the old one I knew it just copied 20GBs.
A side note here: I used skip=5MB and claim it copied 5GB — why’s that? Because skip= skips a given amount of ibs-sized records. In our example ibs=bs=1kB and therefore skip=5M skips 5 millions records, which means it skips to an offset 5GB in /dev/sda12. And reads one kilobyte from there.
Re-running the hashing command every minute or so manually is boring. Instead I wrote a little shell script to record the timestamp when the hashes at a given offset match:
#!/bin/sh
## check-progress.sh from http://hintshop.ludvig.co.nz/show/copy-raw-partition-over-net/
DEVICE=$1
OFFSET=$2
REQ_HASH=$3
if [ "${REQ_HASH}" = "" ]; then
echo "Usage: $0 {device} {offset} {required-hash}"
exit 1
fi
while (true) do
HASH=$(dd if=${DEVICE} count=1 bs=1k skip=${OFFSET} 2>/dev/null | md5sum)
HASH=${HASH:0:32}
if [ ${HASH} = ${REQ_HASH} ]; then
echo "Hashes match: $(date)"
exit 0
fi
echo "Not yet..."
sleep 30
done
To use it I needed a hash value from a given offset on the old-server and then run the script on the new-server:
new-server:~# ./check-progress.sh /dev/sda12 5M 7b10e9e1029c4c0f3901ee13db18a927
Not yet...
Not yet...
...
Hashes match: Sat Feb 14 11:22:33 NZDT 2009
Once it recorded the timestamp I set it up again with a new offset, say 6M, and waited. That way I was able to track the progress and approximately measure the transfer speed. Precise enough to realise it did about 8GB per 15 minutes. Then I knew I’ve had enough time to go and get some lunch.
When searching for an engine for this brand new blog site I’ve come across ByteFlow. It immediately appealed to me, because:
- it’s written in Python, language that I like a lot and use a lot.
- it’s based on Django, framework that I used on one of my past projects.
- seems to have a rich feature set and is being actively developed
On the other hand it’s relatively new and (therefore?) doesn’t come with an overwhelmingly extensive documentation. For start, installation wasn’t a piece of cake. First I tried to run ByteFlow with lighttpd, following a howto on Benjamin Smith’s blog, but ended up with a little problem I didn’t manage to solve. Not knowing much about lighttpd I eventually switched to Apache that I’m pretty familiar with.
The ByteFlow people recommend Apache with mod_wsgi as the best way to run their engine, however information on how to do that are pretty sparse. If you also wonder how read on, I’ll document my setup here. Perhaps you’ll find some useful hints in here.
Required packages
My server runs CentOS 5, which is 99% the same as RedHat Enterprise Linux 5 without the massive price tag attached. I tend to use vendor-provided packages instead of compiling stuff manually where possible. It makes ongoing maintenance much easier. Therefore I’m bound to use httpd 2.2.3, python 2.4.3, mysql 5.0.45 and subversion 1.4.2 as that’s what comes with CentOS 5. Additionally I added EPEL repository to my yum repo list and installed mod_wsgi 2.1 and mercurial 0.9.3. That’s about it for base packages.
ByteFlow however requires some additional Python modules, see its install page for more details. Fortunately EPEL has most of them available: python-imaging, python-openid and python-elementtree.
One little issue I had with MySQLdb — the version found in CentOS is MySQL-python 1.2.1 while Django apparently requires version 1.2.1_p2 or higher. As I said I like to have things packaged so I built an updated RPM myself (download MySQL-python-1.2.1_p2-0_mludvig.i386.rpm).
One last prerequisite is BeautifulSoup module, a HTML parser for Python. It doesn’t come in a package but since it’s just one single stand alone file I didn’t care and simply copied it to the byteflow directory as we’re gonna see later.
Getting Django and ByteFlow
All the resources and files specific to this blog’s vhost will be placed in a dedicated directory. For instance create /www/hintshop, to make our examples shorter.
Both Django and ByteFlow are so new that they are not available as RPM packages for CentOS. Yet. Our best choice is therefore to grab them from their respective source repositories. Go to /www/hintshop and become root or any other user that has write access in there. The run these two commands:
/www/hintshop# svn co http://code.djangoproject.com/svn/django/branches/releases/1.0.X django [...] A django/examples/urls.py A django/setup.cfg U django Checked out revision 9675. /www/hintshop# hg clone http://hg.piranha.org.ua/byteflow destination directory: byteflow [...] updating working directory 557 files updated, 0 files merged, 0 files removed, 0 files unresolvedThat should have created two directories:
django and byteflow respectively. We’ll need two more though:
/www/hintshop# mkdir -p etc www/media www/download /www/hintshop# ls -l total 20 drwxr-xr-x 11 root root 4096 Dec 22 19:54 byteflow drwxr-xr-x 9 root root 4096 Dec 19 02:17 django drwxr-xr-x 2 root root 4096 Dec 22 20:09 etc drwxr-xr-x 4 root root 4096 Dec 22 20:09 wwwThe last step here is to download
BeautifulSoup.py to byteflow/ directory.
ByteFlow configuration
First of all create a database and a dedicated user account in MySQL:
~$ mysql -uroot -p mysql> create database hintshop; mysql> grant all on hintshop.* to 'hintshop'@'localhost' identified by 'BlahBlah';
Now in /www/hintshop/byteflow copy settings_local.py.template to settings_local.py and adjust the settings to your needs. Also have a look in settings.py and eventually override some additional settings in settings_local.py. I for instance added these two lines:
TIME_ZONE = 'Pacific/Auckland' BLOG_URLCONF_ROOT = ''
Don’t forget to comment out DEBUG=True and the following print statement near the end of the config file. Finally run ./manage.py syncdb to initialise the database.
Apache + mod_wsgi configuration
Here the fun stuff begins. For security reasons I like to have different websites run under separate user accounts. So I created a new user hintshop dedicated for running this blog.
Next create a wsgi wrapper script and save it as /www/hintshop/etc/byteflow-wsgi.py:
#!/usr/bin/python
import os, sys
sys.path.append('/www/hintshop/django')
sys.path.append('/www/hintshop/byteflow')
os.environ['DJANGO_SETTINGS_MODULE'] = 'settings'
import django.core.handlers.wsgi
application = django.core.handlers.wsgi.WSGIHandler()
And finally create a new Apache Virtual Host for the blog. In my case it’s file /etc/httpd/conf/vhosts.conf:
<VirtualHost *:80> ServerName hintshop.ludvig.co.nz Alias /media/ /www/hintshop/www/media/ Alias /download/ /www/hintshop/www/download/ Alias /static/ /www/hintshop/byteflow/static/ Alias /admin-media/ /www/hintshop/django/django/contrib/admin/media/ WSGIDaemonProcess site-hintshop user=hintshop group=hintshop threads=5 WSGIProcessGroup site-hintshop WSGIScriptAlias / /www/hintshop/etc/byteflow-wsgi.py ErrorLog logs/hintshop-error_log CustomLog logs/hintshop-access_log combined </VirtualHost>
Now restart Apache with service httpd restart and provided you've got a domain name properly set up you're ready to blog :-)
Let me know if you find any error or omission in this howto. Thanks!